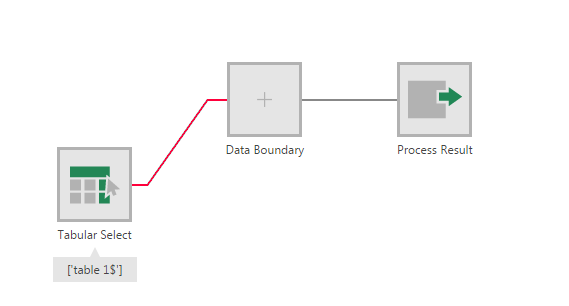
1. Overview
This sample shows how to create a custom data cube transform. As an example, this transform restricts the values to within boundaries that can be configured, with options for how to handle values beyond the boundaries.
You will learn how to do the following:
- Create a Dundas BI extension
- Create a custom data cube transform
- Create a custom UI for the transform
2. Getting started
The current version of the sample solution targets both .NET Framework and .NET Core/.NET 5+ so that the packaged extension will work for Dundas BI version 7 or higher on all platforms.
The following prerequisites must be installed on your computer to build the provided sample without modifications:
- Visual Studio 2017 or higher
- Microsoft .NET Framework 4.7.2 or higher
- Microsoft .NET Core 3.1 or higher
You can modify the sample project to target different versions of .NET if preferred depending on the version used by your Dundas BI instance.
The Dundas BI NuGet packages referenced as dependencies are initially set to version 7.0.1. If your version of Dundas BI is newer and the APIs you are using may have changed, you can update the version of the package references
2.1. Download the sample solution
To download the custom transform sample solution, click here.
(Sample solutions for Dundas BI version 1, versions 2 through 5 and version 6 are also available.)
2.2. Open the solution
Extract CustomTransformSample.zip to a folder and open the solution in Microsoft Visual Studio to build the extension.
To use the option to publish directly to your Dundas BI instance, run Visual Studio as an administrator before opening the solution. For example, you can right-click Visual Studio in the start menu and find the Run as administrator option.
The solution file is located at:
[Extracted folder]\CustomTransformSample\CustomTransformSample.sln
3. The project
The project is a class library.
- CustomTransformSampleIcon.png - This icon is used in the UI by the custom transform.
- CustomTransformSamplePackage.cs - This class contains the package information about the extension package.
- DataBoundaryTransform.cs - Class where the transform is defined.
- DataBoundaryUI.html - An optional HTML file that contains the custom UI for the transform. UI can also be generated automatically if a custom one is not created.
- PublishExtensionTemplate.props - Used for auto publishing the extension after the build succeeds, and defines extension properties, and files.
3.1. ExtensionPackageInfo class
In order for a custom transform to be read by Dundas BI, it needs to contain a class that extends the ExtensionPackageInfo2 class. This class contains the a call to the base constructor that reads extension package information from the extension manifest file, which is packaged with your extension when published.
/// <summary>
/// This class contains the package information about the extension package.
/// </summary>
public class CustomTransformSamplePackage : ExtensionPackageInfo2
{
    /// <summary>Initializes a new instance of the
    ///<see cref="CustomTransformSamplePackage"/> class.</summary>
    /// <param name="extensionManifest">The extension manifest.</param>
    public CustomTransformSamplePackage(ExtensionManifest extensionManifest)
        : base(extensionManifest)
    {
    }
}
3.2. Publish extension template
This sample has a mechanism to automatically publish the extension when building, which is the Dundas.BI.PublishExtension NuGet package. When this package is added to the project, it creates a PublishExtensionTemplate.props file containing MSBuild property and item groups, which define how to create and publish the extension.
When the DtFilePath property is set to the file path of the dt tool of a Dundas BI instance, it will then publish the extension directly to that instance when you build the solution. It will also touch the web.config file to force the web application to reset.
If the DtFilePath property is not set, it will create a .zip file you can add to your Dundas BI instance using the Extensions screen in the administration UI. After building the solution with default settings and the Release solution configuration, this .zip file can be found in the bin\Release\netcoreapp3.1 subfolder of your solution. It targets both .NET Framework and .NET Core.
<Project>
  <Target Name="DefineDundasBIExtensionProperties" AfterTargets="CopyFilesToOutputDirectory">
    <!-- Properties used to publish extension -->
    <PropertyGroup>

      <!-- Extension Author -->
      <ExtensionAuthor>MyCompany Sample Author</ExtensionAuthor>
      <!-- Extension Name -->
      <ExtensionName>$(AssemblyName)</ExtensionName>
      <!-- Extension Display Name -->
      <ExtensionDisplayName>$(AssemblyName)</ExtensionDisplayName>
      <!-- Extension Folder Name -->
      <ExtensionFolderName>$(AssemblyName)</ExtensionFolderName>
      <!-- Extension Main Assembly Name -->
      <ExtensionMainAssemblyName>$(AssemblyName).dll</ExtensionMainAssemblyName>
      <!-- Extension Id -->
      <ExtensionId>487fde27-7517-4b22-9da8-74f2cfa43acb</ExtensionId>
      <!-- Extension Copyright -->
      <ExtensionCopyright>Copyright (c)</ExtensionCopyright>
      <!-- Extension Version -->
      <ExtensionVersion>1.0.0.0</ExtensionVersion>
      <!-- The outfolder where the extension zip file will be left. -->
      <ExtensionOutputFolder>$(OutputPath)</ExtensionOutputFolder>
      <!-- DT -->
      <!-- If this is specified the extension will be installed using dt.  -->
      <DtFilePath></DtFilePath>

      <!-- Framework Folder -->
      <FrameworkFolderRelative>$(OutputPath)\..</FrameworkFolderRelative>
      <FrameworkFolder>$([System.IO.Path]::GetFullPath($(FrameworkFolderRelative)))</FrameworkFolder>

    </PropertyGroup>

    <!-- Define files to include -->
    <ItemGroup>
      <!-- Define the NetFramework assemblies -->
      <NetfwAssemblies Include="$(FrameworkFolder)\net472\CustomTransformSample.*"   />
      <!-- Define the NetCore assemblies -->
      <NetCoreAssemblies Include="$(FrameworkFolder)\netcoreapp3.1\CustomTransformSample.*"  />
      <!-- Define any app resources for the extension. -->
      <AppResources />
      <!-- Define any file resources for the extension. -->
      <FileResources Include="$(MSBuildThisFileDirectory)\CustomTransformSampleIcon.png" />
      <!-- Define any localization files for extension. -->
      <Localizations />
      <!-- Define Extension Supported Runtimes -->
      <ExtensionSupportedRuntimes Include="NetFramework" />
      <ExtensionSupportedRuntimes Include="NetCore" />
    </ItemGroup>
  </Target>
</Project>
For more details on using this package to automate publishing extensions, see Using the Dundas.BI.PublishExtension NuGet package.
3.3. Define the data boundary transform
In order to create a transform, you will need to extend the Transform Class.
using Dundas.BI.Data.Parameters;
using Dundas.BI.Data.Transforms;
  ...

namespace MyCompany.Sample.CustomTransformSample
{
    /// <summary>
    /// This class represents a data boundary transform.
    /// </summary>
    public class DataBoundaryTransform : Transform
	{
      ...
    }
}
3.4. Implement the abstract transform class
3.4.1. Define the component information
/// <summary>
/// Gets the standard component description.
/// </summary>
public override string ComponentDescription
{
	get { return "This transform will enforce a boundary on the data."; }
}

/// <summary>
/// Gets the component ID.
/// </summary>
public override Guid ComponentId
{
	get { return new Guid("3fa26810-cbae-450c-ae53-986a228cdcd9"); }
}

/// <summary>
/// Gets the standard component name.
/// </summary>
public override string ComponentName
{
    get { return "Data Boundary"; }
}
The component name, and description will be visible in the Transform Configure Panel after it is added to a data cube.
3.4.2. Define the processing type
We define the processing type property for the transform as the following:
- Step - The transform node is an intermediate process step.
- SingleRecord - The transform operates on one record at a time. This means that each record can be processed independently.
- SingleElement - The transform can be applied to a single input element.
/// <summary>
/// Gets the type of the processing.
/// </summary>
public override ProcessBehaviors ProcessingType
{
	get
	{
		return ProcessBehaviors.Step | ProcessBehaviors.SingleRecord | ProcessBehaviors.SingleElement;
	}
}
3.4.3. Define inputs, outputs, and settings
To define the inputs, outputs, and settings within our transform, we override the GetMetadata method on the transform.
/// <summary>
/// Populates the process transform metadata by describing the data inputs,
/// outputs and any available settings.
/// </summary>
/// <param name="inputs">The inputs.</param>
/// <param name="output">The output.</param>
/// <param name="settings">The transform settings.</param>
protected override void GetMetadata(
     out IList<InputConnector> inputs,
     out OutputConnector output,
     out IList<Dundas.BI.Data.Parameters.ComponentSetting> settings
)
{
	inputs = this.DefineInputs();
	output = this.DefineOutput();
	settings = this.DefineSettings();
}
3.4.3.1. Inputs
In this transform sample we are defining one input, and one component setting for applying the boundary:
/// <summary>
/// Defines the inputs.
/// </summary>
/// <returns>A list of InputConnectors.</returns>
private IList<InputConnector> DefineInputs()
{
    List<InputConnector> inputs = new List<InputConnector>();

    List<ComponentSetting> elementInstanceParameters = new List<ComponentSetting>();

    this.DefineElementParameters(elementInstanceParameters);

	InputConnector input = new InputConnector(
		this,
		new Guid("cf45944f-57bd-4418-b534-6dc1042e32cc"),
		"Data Boundary Input",
		"Data Boundary Input Description",
		ConnectorDataFormats.Tabular,
		null,
		null,
		elementInstanceParameters,
		false,
		ErrorHandlingPolicy.Fail
	);
	inputs.Add(input);

	return inputs;
}

/// <summary>
/// Defines the element parameters.
/// </summary>
/// <param name="elementInstanceParameters">
/// The element instance parameters.
/// </param>
private void DefineElementParameters(List<ComponentSetting> elementInstanceParameters)
{
    BooleanSetting applyBoundarySetting = new BooleanSetting(
        new Guid("539FCD49-AB5A-42F3-902E-588CDAF14E11"),
        "ApplyBoundary",
        "Apply Boundary to this element.",
        true,
        false,
        false
    );

    elementInstanceParameters.Add(applyBoundarySetting);
}
3.4.3.2. Outputs
In this transform sample we are defining one output:
/// <summary>
/// Defines the output.
/// </summary>
/// <returns>A list of OutputConnectors.</returns>
private OutputConnector DefineOutput()
{
	OutputConnector output = new OutputConnector(
		this,
		new Guid("eb297a8f-87e3-496d-88a9-8f30c9289120"),
		"Data Boundary Output",
		"Data Boundary  Output Description",
		ConnectorDataFormats.Tabular
	);
	return output;
}
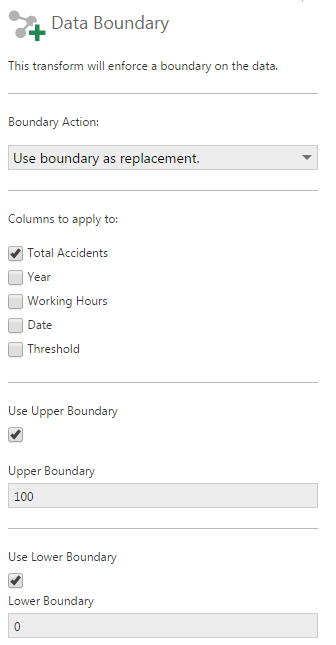
3.4.3.3. Settings
This example demonstrates how to define five different settings. The settings are visible when the configure button on the toolbar is pressed.
/// <summary>
/// Defines the settings.
/// </summary>
/// <returns>A list of component settings.</returns>
private IList<ComponentSetting> DefineSettings()
{
    List<ComponentSetting> settings = new List<ComponentSetting>();
    NumericSetting boundaryViolationActionSetting = new NumericSetting(
        BOUNDARY_VIOLATION_ACTION_ID,
        "Boundary Violation Action",
        "What to do if the boundary is violated.",
        false,
        0,
        ValidValuesSource.ManualList,
        false
    );
    boundaryViolationActionSetting.AddValidValue(
        0,
        "Boundary",
        "Use boundary as replacement."
    );
    boundaryViolationActionSetting.AddValidValue(
        1,
        "Zero",
        "Use zero as replacement."
    );
    boundaryViolationActionSetting.AddValidValue(
        2,
        "Null",
        "Use null as replacement."
    );
    settings.Add(boundaryViolationActionSetting);
    BooleanSetting useUpperBoundarySetting = new BooleanSetting(
        USE_UPPER_BOUNDARY_ID,
        "Use Upper Boundary",
        "Will enforce an upper boundary",
        false,
        false,
        false
    );
    settings.Add(useUpperBoundarySetting);
    NumericSetting upperBoundarySetting = new NumericSetting(
        UPPER_BOUNDARY_ID,
        "Upper Boundary",
        "The upper boundary",
        false,
        0,
        int.MinValue,
        int.MaxValue,
        false
    );
    settings.Add(upperBoundarySetting);
    BooleanSetting useLowerBoundarySetting = new BooleanSetting(
        USE_LOWER_BOUNDARY_ID,
        "Use Lower Boundary",
        "Will enforce an lower boundary",
        false,
        true,
        false
    );
    settings.Add(useLowerBoundarySetting);
    NumericSetting lowerBoundarySetting = new NumericSetting(
        LOWER_BOUNDARY_ID,
        "Lower Boundary",
        "The lower boundary",
        false,
        0,
        int.MinValue,
        int.MaxValue,
        false
    );
    settings.Add(lowerBoundarySetting);
	return settings;
}
3.4.4. Generate output element sources and settings that use the sources
This example demonstrates getting the element sources from the input, and then setting the output sources to the same elements.
/// <summary>
/// Generates the list of <see cref="T:Dundas.BI.Data.Transforms.OutputElementSource" />,
/// which are used elements for an <see cref="T:Dundas.BI.Data.Transforms.OutputConnector" />.
/// </summary>
/// <returns>
/// The list of output element sources.
/// </returns>
public override IList<OutputElementSource> GenerateOutputElementSources()
{
	List<OutputElementSource> outputSources = new List<OutputElementSource>();

	foreach (var element in this.Input.Elements)
	{
		outputSources.Add(new OutputElementSource(this.Output, element, true, false));
	}

	return outputSources;
}
3.4.5. Read and modify the data
In order to read and modify the data, two methods need to be implemented: Read, and FetchElementValue.
The Read method reads a single record for the transform output, if there are any. If there are no more output records, it returns false.
The base class implementation calls Read on all the input readers and returns true if at least one of these operations is successful. Transforms that process a single record at one time do not need to override the base class implementation.
Transforms that process multiple records at one time need to override the base class implementation by retrieving the necessary input data and also performing output record processing. If the Read operation is successful, the transform is responsible for providing corresponding data values on subsequent FetchElementValue calls.
public override bool Read()
{
	bool readValue = base.Read();

	// Reset the column names to read setting, after last read.
	if (!readValue)
	{
		_columnNamesToApplyTo = null;
	}

	return readValue;
}
The FetchElementValue method fetches the value for the specified output element for run time data retrieval. The transforms that process a single element at one time should override this method.
This example demonstrates how to get the element and apply a boundary if it is in the columns to apply to list.
/// <summary>
/// Fetches the value for the specified output element for run time data retrieval.
/// </summary>
/// <param name="outputElement">The output element.</param>
/// <param name="skipValidation">
/// If set to <see langword="true" /> parameter validation is skipped for performance reasons.
/// </param>
/// <returns>
/// The element value.
/// </returns>
/// <exception cref="System.ArgumentNullException">outputElement</exception>
/// <exception cref="System.ArgumentException"></exception>
public override object FetchElementValue(ConnectorElement outputElement, bool skipValidation)
{
	if (!skipValidation)
	{
		if (outputElement == null)
		{
			throw new ArgumentNullException("outputElement");
		}
		if (outputElement.Connector.Transform != this)
		{
			throw new ArgumentException(this.Localize("GS_EX_Invalid_ParentElement"));
		}
	}
	ConnectorElement inputElement = null;
	if (outputElement.UpstreamElement == null)
	{
		inputElement = this.FindConnectorElement(outputElement.Dependencies.First());
	}
	else
	{
		inputElement = outputElement.UpstreamElement;
	}
	object sourceValue = this.Input.ConnectedTo.DataReader[inputElement.UpstreamElement.Id];
	if (!ColumnNamesToApplyTo.Contains(inputElement.UpstreamElement.NativeElementName))
	{
		return sourceValue;
	}
	else
	{
		return ApplyBoundaryToSourceValue(sourceValue);
	}
}
4. Creating a custom UI
To create a custom UI for the transform, you must override the property and methods below:
/// <summary>
/// Gets a value indicating whether this transform is using a custom configuration UI.
/// </summary>
public override bool HasCustomConfigurationUI
{
    get
    {
        return true;
    }
}

/// <summary>
/// Gets the custom configuration UI based on the requested content type.
/// </summary>
/// <param name="contentType">The content type that the UI is requested for.</param>
/// <returns>
/// The string holding the custom UI,
/// or <see langword="null" /> if none is supported for the content type.
/// </returns>
public override string GetCustomConfigurationUI(System.Net.Mime.ContentType contentType)
{
    if (contentType == null)
    {
        return null;
    }
    if (contentType.Equals(MediaTypeNames.Text.Html))
    {
        Assembly assembly = typeof(DataBoundaryTransform).Assembly;
        using (StreamReader streamReader =
            new StreamReader(assembly.GetManifestResourceStream(
                "MyCompany.Sample.CustomTransformSample.DataBoundaryUI.html"
                )
            )
        )
        {
            string contents = streamReader.ReadToEnd();
            return contents;
        }
    }
    return null;

}
4.1. Inside the custom UI HTML page
This sample custom UI contains both HTML, and JavaScript. The settings need to be connected to the different HTML elements. The JavaScript is used to show and hide elements of the UI based on whether other elements are selected or not.
4.1.1. HTML
The code below hooks itself to the transform code by specifying attributes for id, name, and the data-valuetype.
<div id="dataBoundaryTransform_SettingsSection">

    <!--
        This section defines the type of boundary action to take
        as a replacement for datapoints that violate the boundary
        The property is connected to the d4c68615-2ada-4923-8d75-d900711a4293
        that is a boundary violation action numeric setting from the
        transform definition.
        -->
    <div class="pluginDialog-splitter"></div>
    <p><label title="Set the type replacement for a boundary violation" />Boundary Action:</p>
    <div>
        <select title="Set the type replacement for a boundary violation"
            id="d4c68615-2ada-4923-8d75-d900711a4293"
            name="d4c68615-2ada-4923-8d75-d900711a4293"
            data-valuetype="SingleNumber"
            >
            <option value="0">Use boundary as replacement.</option>
            <option value="1">Use zero as replacement.</option>
            <option value="2">Use null as replacement.</option>
        </select>
    </div>
    <!--
        This section represents the columns to apply to boolean settings.
        These inputs are dynamically added a runtime, and are defined in the
        GenerateOutputElementSources method within the transform definition.
    -->
    <div class="pluginDialog-splitter"></div>
    <div id="columnsToApplyDataBoundaryTo">
        <p><label title="Will enforce an upper boundary">Columns to apply to:</label></p>
    </div>
    <div class="pluginDialog-splitter"></div>
    <p>
        <!--
            This section represents the use upper boundary boolean
            setting from the transform definition.
        -->
        <label for="F4441C7B-95C5-443E-9ED5-1B679132ADC7"
            title="Will enforce an upper boundary"
            >Use Upper Boundary</label>
        <input type="checkbox"
            id="118ae60c-90a5-4693-a24a-5308877811a8"
            name="118ae60c-90a5-4693-a24a-5308877811a8"
            data-valuetype="SingleBoolean"
            />
        <div id="upperBoundarySection">
            <label title="The upper boundary">Upper Boundary</label>
            <input type="number"
                id="b60311fd-b3b9-401a-b61d-2fa078c4a05d"
                name="b60311fd-b3b9-401a-b61d-2fa078c4a05d"
                data-valuetype="SingleNumber"
                />
        </div>
        <div class="pluginDialog-splitter"></div>
        <!--
            This section represents the use lower boundary boolean
            setting from the transform definition.
        -->
        <label
            for="F4441C7B-95C5-443E-9ED5-1B679132ADC7"
            title="Will enforce an lower boundary">
            Use Lower Boundary
        </label>
        <input
            type="checkbox"
            id="c9306ec6-4dcc-4db6-af5a-8e5186345a5e"
            name="c9306ec6-4dcc-4db6-af5a-8e5186345a5e"
            data-valuetype="SingleBoolean"
            />
        <div id="lowerBoundarySection">
            <label title="The lower boundary">Lower Boundary</label>
            <input
                type="number"
                id="a60efc80-41fa-451b-875d-50c8bbfa1cb7"
                name="a60efc80-41fa-451b-875d-50c8bbfa1cb7"
                data-valuetype="SingleNumber"
                />
        </div>
    </p>
</div>
4.1.2. Hook up a Boolean setting
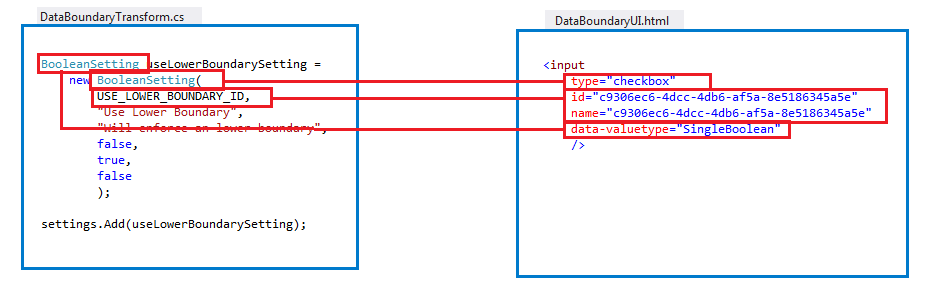
This image demonstrates how to set up a Boolean setting on the transform and the custom UI:
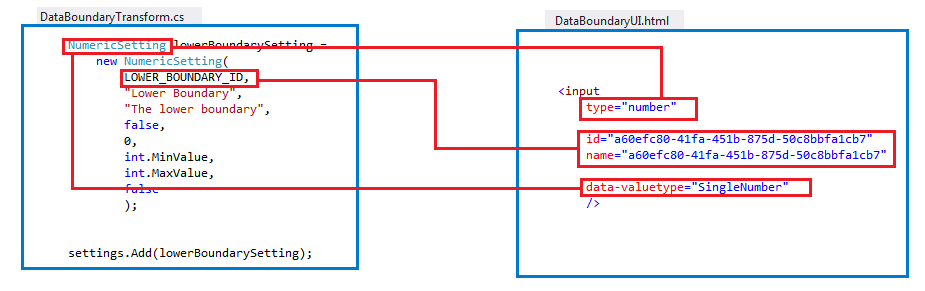
4.1.3. Hook up a numeric setting as number input
This image demonstrates how to set up a numeric setting as a number input on the transform and the custom UI:
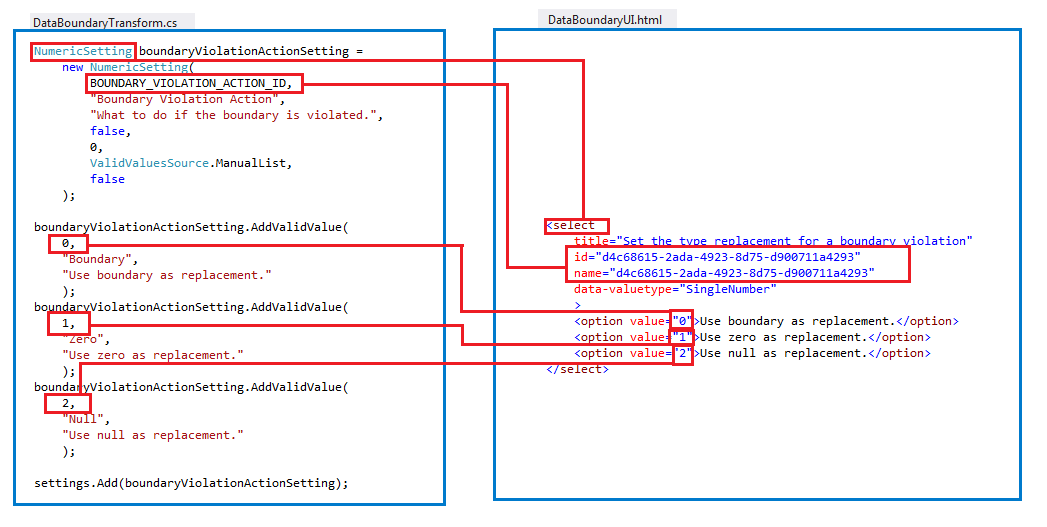
4.1.4. Hook up a numeric setting as combo box
This image demonstrates how to set up a numeric setting as a combo box on the transform and the custom UI:
4.2. JavaScript
This example demonstrates how to get different objects from within the JavaScript, and how to hook into a transform event.
<script>
    (function ($) {

        // defines the current dialog.
        var currentDialog = dundas.context.currentDialogShown.dialogElement;

        // defines the view service.
        var viewService = dundas.context.getService("ViewService");

        // Gets the transform viewmodel
        var viewModel = dundas.context.currentDialogShown.contents.data(
            dundas.controls.TransformDialogConstants.transformDialogVmDataName
        );

        // Gets the input element from the transform
        var inputElements = viewModel.inputs()[0].elements;

        // Loops the elements on the input.
        for (var index = 0; index < inputElements.length; index++) {
            var elementName = inputElements[index].elementName();

            // The input element settings are defined starting at index 5
            // thus we are grabbing them at index 5 and above.
            var itemId = inputElements[index].id;

            // Adding columns as checkboxes to the placeholder element
            // defined above.
            $("#columnsToApplyDataBoundaryTo").append(
                "<div><input type='checkbox' id='"
                 + itemId
                 + "' name='"
                 + itemId
                 + "' data-valuetype='SingleBoolean' /> <span>"
                 + elementName
                 + "<span></div>"
            );

            // Initialize existing element setting
            $("#" + itemId).prop("checked", inputElements[index].businessObject.settingValues[0].value);

            // Handle click for the checkboxes.
            $("#" + itemId).click({ input:  inputElements[index] }, function (event)
            {

                if ($(this).prop("checked") == true) {
                    var element = event.data.input.businessObject.settingValues[0].value = true;
                }
                else if ($(this).prop("checked") == false) {
                    event.data.input.businessObject.settingValues[0].value = false;
                }
            });
        }

        // This will fire after the binding has been completed.
        $(document).bind(dundas.controls.TransformDialogConstants.bindingCompletedEventName, function () {

            // The following will show or hide options based on
            // if the checkboxes are checked or not.
            function validateCheckboxWithSection(checkBoxId, sectionIdToShowOrHide) {
                if ($(checkBoxId).is(':checked')) {
                    $(sectionIdToShowOrHide).show();
                }
                else {
                    $(sectionIdToShowOrHide).hide();
                }
            }

            $('#118ae60c-90a5-4693-a24a-5308877811a8').change(function () {
                validateCheckboxWithSection('#118ae60c-90a5-4693-a24a-5308877811a8', '#upperBoundarySection');
            });

            $('#c9306ec6-4dcc-4db6-af5a-8e5186345a5e').change(function () {
                validateCheckboxWithSection('#c9306ec6-4dcc-4db6-af5a-8e5186345a5e', '#lowerBoundarySection');
            });

        });
    })(jQuery);
</script>
4.2.1. Other JavaScript events to hook into
The following code shows the before save, binding completed, and before binding JavaScript events you can hook into from the custom transform UI. Also included in the sample below is how to obtain the transform object, dialog, and view service, and define the transform inputs, outputs, and settings.
// The before save event.
$(document).bind(dundas.controls.TransformDialogConstants.beforeSaveEventName,
    function (e, eventsData) {
        var viewModel = eventsData.viewModel;
        var viewService = dundas.context.getService("ViewService");
    }
);
// The binding completed event.
$(document).bind(dundas.controls.TransformDialogConstants.bindingCompletedEventName,
    function (e, eventsData) {
        var currentDialog = $(dundas.context.currentDialogShown.dialogElement);
        var viewModel = dundas.context.currentDialogShown.contents.data(
            dundas.controls.TransformDialogConstants.transformDialogVmDataName
        );
        var viewService = dundas.context.getService("ViewService");
    }
);
// The before binding event.
$(document).bind(dundas.controls.TransformDialogConstants.beforeBindingEventName,
    function (e, eventsData) {
        var viewModel = eventsData.viewModel;
        var transform = viewModel.businessObject;
    }
);
4.2.2. Custom icons
To implement custom icons for the transform in the data cube editor, the following properties need to be implemented on the transform class: IsAvailableInToolbar, ToolbarIconUri, and NodeIconUri. The icon needs to be included as a FileResource in the PublishExtensionTemplate.props file. The following example demonstrates how to add custom icons to the transform:
/// <summary>
/// Gets a value indicating whether or not the transform will be available
/// in the toolbar.
/// </summary>
public override bool IsAvailableInToolbar
{
    get
    {
        return true;
    }
}

/// <summary>
/// Gets a value indicating the relative path
/// to be used as the transform's icon in the toolbar.
/// </summary>
public override Uri ToolbarIconUri
{
    get
    {
        return new Uri(
            "ExtensionResources/CustomTransformSample/CustomTransformSampleIcon.png",
            UriKind.Relative
        );
    }
}


/// <summary>
/// Gets a value indicating the relative path
/// to be used as the transform's node icon when rendered on the canvas.
/// </summary>
public override Uri NodeIconUri
{
    get
    {
        return new Uri(
            "ExtensionResources/CustomTransformSample/CustomTransformSampleIcon.png",
            UriKind.Relative
        );
    }
}
5. Debugging
To debug the transform, you can use the following:
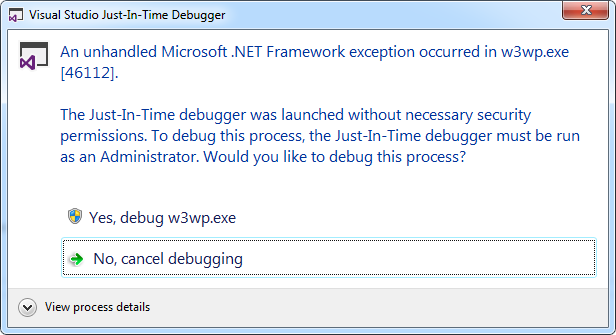
System.Diagnostics.Debugger.Launch();
This will pop up a window that will allow you to attach the debugger.
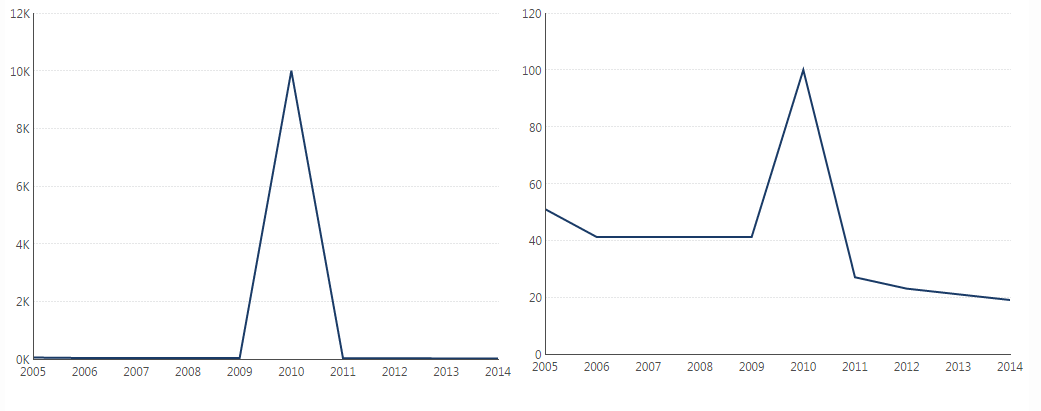
6. Result
The result of the sample is a custom transform added to a Dundas BI instance as an extension. This transform contains inputs, outputs, and settings. Also, it implements a custom UI that shows and hides elements based on what settings are being used. This transform example can be used to restrict the data to within the set boundaries.
The following image shows a before and after of the data boundary being applied. The after has an upper data boundary of 100 set, making a trend easier to see in other data points.