
Connecting to Access
1. Overview
This article describes options available when connecting to a Microsoft Access file data source.
Main article: Connect to data and view it on a dashboard
2. Drag and drop an Access file
The easiest way to work with an Access file is to drag it from Windows Explorer or Finder and drop it directly onto the Explore window or the canvas of the file you're working on.

This will automatically create a corresponding data connector. Expand the data connector and drag a table to the canvas to see its data.

This is similar to dragging and dropping an Excel file.
3. Connect to Access file
You can also create a data connector, then either choose a file to upload or specify its location. See Connect to data and view it on a dashboard for a general walkthrough on creating and using a data connector.
After setting the Data Provider to Microsoft Access for a data connector, specify the Access file you want to connect to using one of these options:
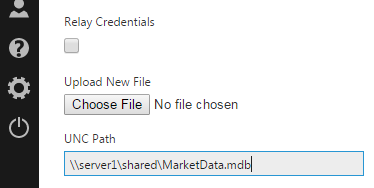
- Click Choose File and select an Access file to upload. This version of the file will be used as the data source, and it will not be updated with any future changes unless replaced by editing the data connector and uploading a new file in its place.
- Or, use the Data Source or UNC Path option to specify the full network path to the file. The data connector will access the file at this location, and changes to this file will be reflected in the application. Example: \\server1\shared\MarketData.mdb
If you specified the path to your file rather than uploading it, click the Authentication dropdown to choose an authentication method used for accessing the location you specified. For example, set it to Specified Windows credentials and enter the domain, username, and password for a Windows account that has access to the file.
In typical cases, you can simply click Submit to create the data connector, but there are some advanced options you can set as described in later sections.

4. Options
The following options are available for the Microsoft Access data provider.
4.1. Advanced
- Extended Properties - Provider-specific connection information that cannot be described explicitly through standard properties.
- Locale Identifier - The locale ID (LCID) specifies the database's collating order, which is the character set that will be used to determine how values in the database are sorted.
- Authentication - The authentication method to use.

4.2. Jet OLEDB
- Database Password - Required to open a password-protected database.
- Registry Path - The path to the registry subkey to use for Jet database engine settings.
- Database Locking Mode - Specifies the mode used when locking the database to read or modify records.

4.3. Security
- User ID - The user's ID (for user-level security).
- User Password - The user's password (for user-level security)
- System Database - Specifies the location of the Microsoft Jet workgroup information
