Migrate from Microsoft SQL Server to PostgreSQL or vice versa
1. Overview
This article will detail the process of moving the Dundas BI application and warehouse databases between Microsoft SQL Server and PostgreSQL database types. There are two strategies for doing this:
- Create a new instance and transfer the items over. (Recommended)
- Convert the application and warehouse databases using another tool.
2. Create a new instance and transfer the items over
2.1. Create destination instance with new application database type
The first step is to create a new destination instance. When creating this instance, on the Select Type screen, you should select the type of database you would like to migrate to.
For more information on creating an instance, see: Installing Dundas BI.
2.2. Transferring content
Most content in a Dundas BI instance can be exported and imported easily through a DBIE file.

Log on to the source instance, click Admin in the main menu, click to expand Import / Export and choose Export. Select all of your desired content, including accounts, groups, projects, settings, and the other options provided in the Advanced Options step. Click Finish and download the file, which has a .dbie extension.
Now log on to the destination instance to import this content. Click Admin in the main menu, click to expand Import / Export and choose Import. Drag onto the screen or browse to find the DBIE file you just created. Select all of the exported content, including accounts, groups, projects, settings, and the other options provided in the Advanced Options step, then click Finish.
For more information on importing and exporting between Dundas BI instances, see: Import and export a project. Some items such as log entries and job history will not be transferred as part of this process.
2.3. Copying override files and extensions
If you are using custom app styling, white labeling, or override files to add custom CSS, JavaScript, HTML, or localization, they can be included in the DBIE file described above if you added them within the Dundas BI interface as shown in the articles on white labeling and localization. Choose the options to include built-in resources and/or static resources.
If you have created or installed any extensions yourself, these will need to be moved separately. In version 7 and up, extensions are managed within Dundas BI in Admin by clicking to expand Setup, then choosing Extensions. Custom extensions (e.g., not with Dundas Data Visualization as the author) can be re-downloaded from the Extension Details dialog by double-clicking an extension or opening its details, then added to the new instance.
If you placed additional files yourself within the Dundas BI instance installation folders, they will need to be copied over. For example, the following Override or whitelabel folders may have been used in earlier Dundas BI versions as described in the white labeling article:
- [InstanceDir]\www\BIWebsite\wwwroot\Scripts\Override\
- [InstanceDir]\www\BIWebsite\wwwroot\Content\Override\
- [InstanceDir]\www\BIWebsite\wwwroot\Content\Images\whitelabel
- [InstanceDir]\www\BIWebsite\wwwroot\Override\

3. Convert existing databases
3.1. Remove warehouse database connection string
Log on to the Dundas BI instance as an administrator and click Admin in the main menu on the left. Select Setup, and choose Config. Edit the warehouse connection string setting, then select the option to reset to default and click the submit button.
3.2. Stopping the application and scheduler
The Dundas BI web application (or its application pool) and its scheduler service should both be stopped. The steps below detail this for Windows servers, while on Linux you can find details in the article Dundas BI Linux services.
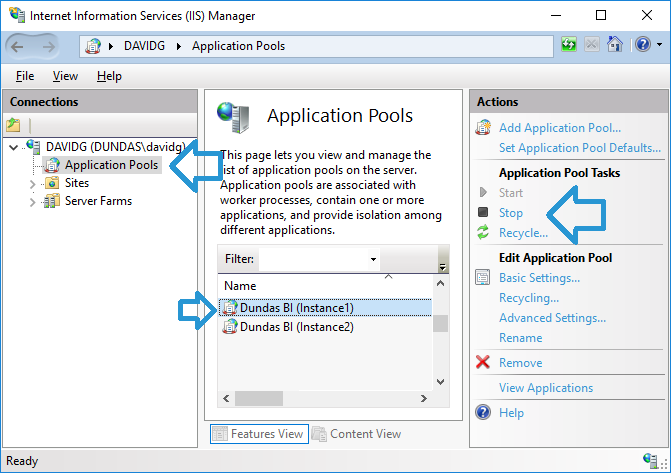
On Windows, search for the Internet Information Services (IIS) Manager in the start menu. In the left side tree view, click Application Pools. Now select the application pool or pools with the instance name in parentheses, and choose the Stop action.

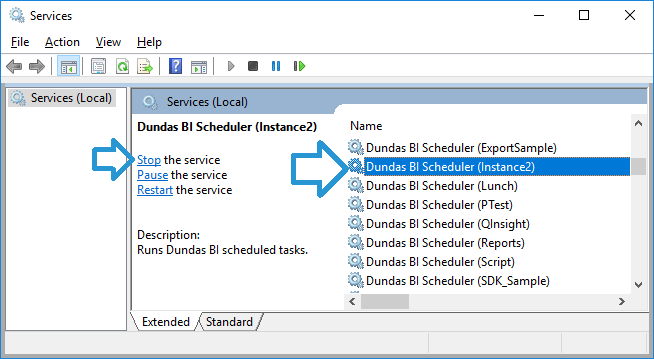
Search for Services in the start menu. Find the service with the name Dundas BI Scheduler ({Your Instance Name}), right click on it, and select Stop.

3.3. Convert the application and warehouse databases
Dundas does not have any supported applications to do this. If you are using a third party tool to convert the database schema, the schema created in the conversion must be the same as one created by Dundas BI when creating a new database. This may be time consuming, which is why creating a separate instance and transferring content to it using a DBIE file is the preferred method for migrating between database types.
3.4. Edit the configuration file
To edit the Dundas BI configuration file, you will need to first decrypt the connection information if it was encrypted. To do this, use the dt tool with a command like the following:
C:\Program Files\Dundas Data Visualization Inc\Dundas BI\Instances\{InstanceName}\tools\dt.exe connectionConfig decrypt
Update the config file with the new connection string information. This file is typically found at:
C:\Program Files\Dundas Data Visualization Inc\Dundas BI\Instances\{InstanceName}\www\BIWebsite\App_Data\dbi.config

OR

C:\Program Files\Dundas Data Visualization Inc\Dundas BI\Instances\{InstanceName}\www\BIWebsite\App_Data\dundasBIConnection.config
The ApplicationStorage value as well as the corresponding connectionString will need to be updated:
<!--
The type of database server hosting the Application database.
Can be "SqlServer" or "Postgres".
-->
<add key="ApplicationStorage" value="SqlServer" />
<connectionStrings>
    <add name="AppConnectionString"
       connectionString="Data Source=.;Initial Catalog=Dundas BI InstanceName;User ID=DundasUser;Password=1234"
     />
</connectionStrings>
After updating the configuration file, it is best pest practice to then encrypt its connection information. You do this with a command like the following:
C:\Program Files\Dundas Data Visualization Inc\Dundas BI\Instances\{InstanceName}\tools\dt.exe connectionConfig encrypt
3.5. Start services
To start the Dundas BI application(s) follow the same steps as when stopping services above but choose Start instead.
3.6. Set the warehouse connection string
Log on to the Dundas BI instance as an administrator and click Admin in the main menu. Click to expand Setup and then choose Config. Edit the warehouse connection string setting and set it to the new converted warehouse connection string, and then click the submit button.
